Battery switch on travel trailer function is crucial for managing your RV’s power. Understanding how your battery switch works – whether it’s a simple single switch or a more complex dual or rotary system – is key to preventing dead batteries and keeping your appliances running smoothly. This guide breaks down everything you need to know, from basic operation to troubleshooting common issues.
We’ll explore the different types of switches, their wiring, and how they interact with your trailer’s charging system, solar panels, and shore power. We’ll also cover essential safety precautions and maintenance tips to keep your system running efficiently and safely for years to come. Get ready to become a battery switch expert!
Battery Switch Types in Travel Trailers

Choosing the right battery switch for your travel trailer is crucial for managing your power sources effectively and preventing electrical issues. Understanding the different types available will help you make an informed decision based on your specific needs and setup. This section details the common types, their advantages and disadvantages, and their wiring configurations.
Single Battery Switches
A single battery switch is the simplest type, designed for a single battery setup. It’s a basic on/off switch that connects or disconnects the battery from the trailer’s electrical system. This is suitable for smaller trailers with only one battery supplying power.Advantages: Simple, inexpensive, easy to install.Disadvantages: Limited functionality; only one battery can be used at a time; no ability to isolate the battery from the charging system.Wiring Configuration: The switch is wired in series between the battery and the trailer’s electrical system.
A single wire runs from the positive (+) terminal of the battery to the switch, then from the switch to the positive bus bar of the trailer’s electrical panel. A separate ground wire connects the battery’s negative (-) terminal to the trailer’s ground.
Dual Battery Switches
Dual battery switches allow you to manage two batteries independently. Common types include rotary switches and switches with individual on/off controls for each battery. These are ideal for trailers with two batteries, often one for house power and one for starting the tow vehicle.Advantages: Allows independent control of two batteries, enabling separate use for house and starting systems.
Provides a way to isolate batteries for maintenance or to prevent battery drain.Disadvantages: More complex than single switches; slightly more expensive; requires more careful wiring.Wiring Configuration: A rotary switch typically has positions for “Both,” “Battery 1,” “Battery 2,” and “Off.” Each position connects the appropriate battery or batteries to the trailer’s electrical system. Individual on/off switches offer more direct control, with separate circuits for each battery.
So, you’re an audiophile who travels? Awesome! Check out this guide on setting up your audiophile travel setup to make sure your tunes sound amazing on the go. And don’t forget to get travel insurance – seriously, it’s a lifesaver. Look into Aon travel insurance for comprehensive coverage; you’ll be glad you did, especially if your precious headphones get damaged!
Careful attention must be paid to ensuring correct positive and negative connections for each battery.
Rotary Battery Switches
Rotary battery switches are a common type of dual or even triple battery switch. They offer multiple positions allowing you to select which battery (or combination of batteries) feeds the trailer’s 12V system.Advantages: Compact, versatile, often includes an “all off” position for complete isolation.Disadvantages: Can be more difficult to understand the positions compared to simple on/off switches.
Comparison Table
| Switch Type | Number of Batteries | Advantages | Disadvantages |
|---|---|---|---|
| Single | 1 | Simple, inexpensive, easy to install | Limited functionality, no isolation |
| Dual (Rotary) | 2 | Independent control, isolation capability, compact | Slightly more complex wiring |
| Dual (Individual On/Off) | 2 | Clear control of each battery | Requires more space for installation |
Function and Purpose of the Battery Switch: Battery Switch On Travel Trailer Function
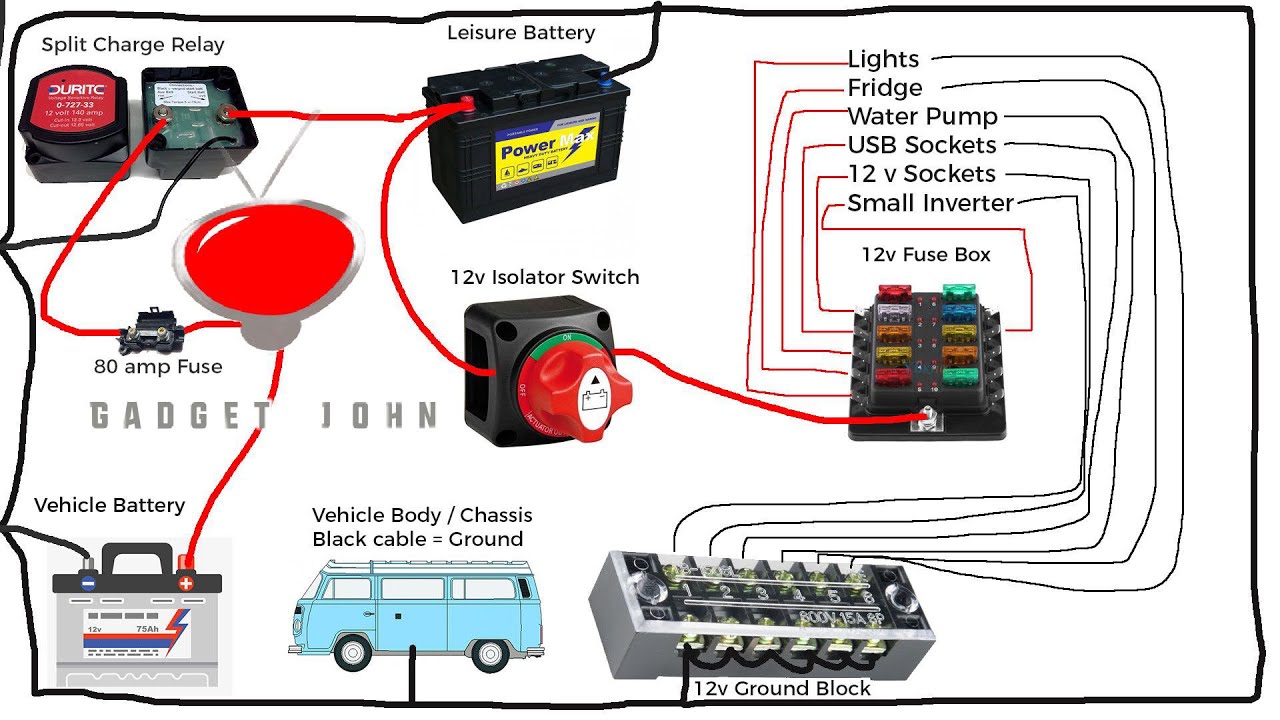
The battery switch in your travel trailer is a crucial component of its electrical system, acting as a central control point for managing power flow between your house batteries and your tow vehicle’s starting battery. It’s essential for safe and efficient operation, preventing unwanted battery drain and protecting sensitive electronics.The primary function of the battery switch is to isolate your travel trailer’s house batteries from the tow vehicle’s starting battery when the trailer isn’t connected.
This prevents the house batteries from draining the vehicle’s battery, leaving you stranded. Conversely, it allows you to charge the house batteries while towing by connecting them to the vehicle’s charging system. Proper use of the battery switch is key to maintaining the health of your batteries and avoiding costly repairs.
Power Distribution Between House and Starting Batteries
The battery switch typically offers several positions, often labeled “Off,” “Battery,” “Both,” and sometimes “Tow.” The “Off” position completely disconnects both batteries, preventing any power flow. The “Battery” position connects only the house batteries, allowing you to use the trailer’s appliances without drawing power from the tow vehicle. The “Both” position connects both the house and starting batteries, usually used for charging the house batteries while connected to the tow vehicle.
The “Tow” position (if present) optimizes the charging process while towing, often preventing overcharging. Understanding these positions is vital for proper operation.
Preventing Battery Drain and Protecting Sensitive Electronics
Leaving the house batteries connected to the starting battery while the trailer is not connected to the tow vehicle can lead to significant battery drain. This is because even small parasitic draws from things like clocks or smoke detectors can eventually deplete the vehicle’s battery. The battery switch prevents this by providing a means to completely isolate the house batteries.
Furthermore, the switch also offers protection for sensitive electronics in the trailer by ensuring a clean power supply. It helps prevent voltage spikes and fluctuations that could damage delicate components.
Safe Operation of a Battery Switch, Battery switch on travel trailer function
Operating the battery switch is straightforward but requires careful attention to avoid accidental short circuits or damage to your batteries.
- Identify the switch positions: Familiarize yourself with the labels on your specific battery switch. Common positions include “Off,” “Battery,” “Both,” and potentially “Tow.”
- Turn the switch to the “Off” position: Before connecting or disconnecting the trailer from the tow vehicle, always start with the switch in the “Off” position. This ensures complete isolation of the batteries.
- Connect or disconnect the trailer: Connect or disconnect your trailer from the tow vehicle according to the manufacturer’s instructions.
- Select the appropriate switch position: Once connected, select the appropriate switch position based on your needs. Use “Battery” to power the trailer’s appliances without charging from the vehicle, “Both” to charge the house batteries while connected, and “Tow” (if applicable) for optimized charging while towing.
- Monitor battery levels: Regularly check the voltage of both your house and starting batteries to ensure they are charging correctly and not experiencing excessive drain.
Troubleshooting Common Battery Switch Issues
Your travel trailer’s battery switch is a crucial component, ensuring you can easily disconnect your house batteries when not in use, preventing drain and potential damage. Problems with this switch can leave you stranded without power. Understanding common issues and how to troubleshoot them is essential for maintaining your RV’s electrical system.Troubleshooting a faulty battery switch involves systematically checking various components and connections.
This process eliminates potential problems one by one, leading you to the source of the malfunction. Remember safety first – always disconnect the negative battery terminal before working on any electrical components.
Common Battery Switch Problems
Several issues can arise with your travel trailer’s battery switch. These include a malfunctioning switch itself (internal failure), loose or corroded connections at the switch or battery terminals, and damaged wiring. A faulty switch might fail to completely disconnect the battery, leading to slow discharge. Loose connections can cause intermittent power or complete failure. Corrosion significantly impedes electrical conductivity, resulting in similar problems.
Troubleshooting Steps
First, visually inspect the switch and all connections. Look for obvious signs of damage, loose wires, or corrosion. Clean any corroded terminals with a wire brush and baking soda solution. Tighten any loose connections. If the switch itself appears damaged or if cleaning doesn’t resolve the issue, check the continuity of the circuit using a multimeter.
This involves testing the resistance between the terminals of the switch in its various positions (ON, OFF). A multimeter reading of near zero ohms indicates a good connection; a high resistance reading suggests a problem within the switch or its wiring. If the switch tests faulty, replacement is necessary. If the wiring shows high resistance, the wiring itself may need repair or replacement.
So, you’re an audiophile who loves to travel? Awesome! Make sure you check out this guide on audiophile travel setups before you go – it’s packed with tips for keeping your ears happy on the road. And speaking of travel, don’t forget insurance! Protecting your trip with solid travel insurance is crucial, and Aon travel insurance is a popular option worth looking into.
Get those details sorted, and you’ll be set for an amazing, sonically-pleasing adventure!
Troubleshooting Flowchart
Imagine a flowchart with the following steps:
1. Start
Begin by visually inspecting the battery switch and all connections for damage, looseness, or corrosion.
2. Corrosion/Looseness?
If yes, clean terminals and tighten connections. If no, proceed to step
3. 3. Test Switch Continuity
Use a multimeter to check the resistance between the switch terminals in different positions (ON, OFF).
4. Good Continuity?
If yes, the problem likely lies elsewhere in the electrical system. If no, proceed to step
5. 5. Replace Switch
If the multimeter indicates a faulty switch, replace the switch with a new one of the same type and amperage rating.
Tools and Materials for Battery Switch Repair
Before starting any repair, gather the necessary tools and materials. This will make the process smoother and more efficient.
- Wire brush
- Baking soda
- Water
- Multimeter
- Screwdrivers (appropriate size for your switch)
- Replacement battery switch (if needed)
- Wrench (for battery terminals)
- Protective eyewear
- Work gloves
Remember to always disconnect the negative battery terminal before performing any repairs. Improper handling of electrical components can lead to injury or damage.
Safety Precautions When Using a Battery Switch
Working with your travel trailer’s electrical system, including the battery switch, requires careful attention to safety. Improper handling can lead to serious injury, from minor burns to severe electrical shocks. Always prioritize safety when performing any maintenance or operation on your trailer’s electrical components.
Before you even touch the battery switch or any part of your trailer’s electrical system, it’s crucial to understand the potential hazards. Working with electricity can be dangerous, and even a seemingly minor mistake can have significant consequences. This section Artikels essential safety measures to protect yourself from harm.
Potential Dangers Associated with Battery Switch Use
Understanding the potential risks is the first step to safe operation. Improper handling of the battery switch and related components can lead to a variety of problems, some with serious consequences.
- Electrical Shock: Direct contact with exposed wires or terminals while the system is live can result in a potentially fatal electrical shock. The current flowing through the system is strong enough to cause serious injury or death.
- Burns: High current flowing through a poorly connected wire or switch can generate significant heat, leading to burns on skin and damage to equipment.
- Battery Acid Exposure: Battery acid is corrosive and can cause serious chemical burns to skin and eyes. Always wear appropriate eye protection and gloves when working near batteries.
- Fire Hazard: Sparks from loose connections or short circuits can ignite flammable materials, especially in a confined space like a travel trailer. This can lead to a dangerous fire.
- Explosions: Hydrogen gas is produced during battery charging and can be highly flammable. Sparks near a battery can ignite this gas, leading to an explosion.
Safety Measures to Prevent Electrical Shocks and Other Hazards
Taking preventative measures is paramount when working with any electrical system. Always follow these guidelines to minimize risk:
- Disconnect the Power: Before working on any part of the electrical system, always disconnect the power source. This means disconnecting the battery cables (negative first, then positive) at the battery itself, not just relying on the battery switch. This ensures the system is completely de-energized.
- Use Insulated Tools: Always use insulated tools when working with electrical connections. This prevents accidental contact with live wires and reduces the risk of electrical shock.
- Wear Protective Gear: Wear safety glasses or goggles to protect your eyes from sparks and battery acid splashes. Wear gloves to protect your hands from cuts, burns, and chemical exposure. Consider using a respirator if working in a poorly ventilated area.
- Work in a Well-Lit Area: Good lighting allows you to see clearly and avoid accidental contact with wires or other components.
- Have a Fire Extinguisher Nearby: Keep a fire extinguisher readily available in case of a fire. Know how to use it properly.
- Know Your Limits: If you are uncomfortable or unsure about any aspect of working on your travel trailer’s electrical system, seek help from a qualified electrician.
Illustrative Example of Hazards in a Live Electrical System
Imagine reaching into a dimly lit compartment to adjust a wire near the battery switch while the system is still live. You might accidentally touch a live wire, resulting in an immediate and painful electric shock. The intensity of the shock depends on the voltage and amperage of the current, but even a low-voltage shock can cause muscle spasms, potentially throwing you off balance and causing further injury from falling or contact with other objects.
A higher voltage shock could lead to serious burns, cardiac arrest, or even death. This illustrates the critical importance of always disconnecting the power source before performing any work on the electrical system.
Maintaining the Battery Switch
Regular maintenance of your travel trailer’s battery switch is crucial for ensuring reliable power and extending the lifespan of both the switch and your batteries. Neglecting this simple task can lead to corrosion, poor connections, and ultimately, system failure – leaving you stranded without power. A little preventative care goes a long way.Keeping your battery switch clean and properly connected is essential for preventing problems.
Corrosion is a major culprit in battery switch malfunctions, creating resistance and reducing power flow. Regular inspection and cleaning will help you identify and address any issues before they become major headaches. This includes checking the switch itself, the wiring, and the battery terminals.
Preventative Maintenance Schedule
A good rule of thumb is to inspect your battery switch and connections every three months, or before and after each extended trip. This allows you to catch minor issues early. A more thorough cleaning should be done at least once a year, or more often if you notice signs of corrosion. This schedule ensures optimal performance and longevity of your battery system.
Cleaning Corroded Battery Terminals and Connections
Corrosion on battery terminals is a common problem, hindering the flow of electricity. Here’s how to clean them:
- Safety First: Always disconnect the negative battery cable first before starting any work on the battery or its connections. This prevents accidental short circuits.
- Gather Supplies: You’ll need a wire brush (preferably a brass one), baking soda, water, a stiff-bristled brush, and safety glasses.
- Prepare the Solution: Mix a paste of baking soda and water. This paste is a gentle yet effective cleaning agent for battery terminals.
- Clean the Terminals: Use the wire brush to remove loose corrosion from the terminals and cable ends. Scrub thoroughly until the metal is clean and shiny.
- Apply the Paste: Apply the baking soda paste to the terminals and cable ends, letting it sit for a few minutes to help neutralize any remaining acid.
- Scrub Again: Use the stiff-bristled brush to scrub away the paste and any remaining corrosion. Rinse thoroughly with clean water.
- Reconnect: After everything is completely dry, reconnect the negative cable first, followed by the positive cable.
Preventing Corrosion
Preventing corrosion is far easier than cleaning it up. Here are some tips:
- Use a Battery Terminal Protector: These inexpensive covers create a barrier between the terminals and the elements, significantly reducing corrosion.
- Apply Anti-Corrosion Grease: A thin layer of dielectric grease on the terminals and connections will repel moisture and prevent corrosion from forming.
- Keep the Battery Area Clean and Dry: Regularly clean the battery area to remove dirt, debris, and spilled battery acid.
- Ensure Proper Ventilation: Good ventilation around the battery helps prevent the buildup of corrosive gases.
Mastering your travel trailer’s battery switch is a vital skill for any RV owner. By understanding its function, performing regular maintenance, and knowing how to troubleshoot common problems, you can ensure a reliable power supply for all your adventures. Remember safety first – always disconnect power before working on any electrical components. Happy travels!
FAQ Resource
What happens if my battery switch is faulty?
A faulty switch can lead to dead batteries, malfunctioning appliances, and even fire hazards. Symptoms include dim lights, non-functioning appliances, and inability to charge batteries.
How often should I clean my battery terminals?
Ideally, inspect and clean your battery terminals every three months or before each extended trip. Corrosion can significantly impact battery performance.
Can I use a battery switch with solar panels?
Yes, but proper wiring is essential. Consult your solar panel and battery switch manuals for specific instructions.
What type of battery switch is best for my travel trailer?
The best type depends on your needs and setup. A single switch is simplest, while dual switches offer more control. A rotary switch provides the most flexibility.
